


Pink Eyeshadow with Glitter AND Graphic Eyeliner
Expand Your Creativity with this Makeup Look

It's time to ditch the basics and take your makeup game up a notch.
When it comes to makeup, there are so many ways to experiment with your look. Some of the most popular makeup trends right now are graphic eyeliner, pink eyeshadow, and the forever coveted cut crease. This step-by-step makeup tutorial will show you exactly how to achieve these trends, along with a video for reference.
You're going to need the perfect pink eyeshadow, some graphic eyeliner, a defining eyebrow pencil, a nude lip pencil, and some false lashes for this look. It's all about enhancing your eyes and making them POP.
As you can see, we have already completed our face makeup and are going straight into all the fun details. Are you ready? Here we go!
How to Apply Eyebrow Pencil


-
Use the eyebrow spoolie to brush your eyebrows up and out, so we can see what areas of our brows are sparse and need filling. The eyebrow spoolie is on the other end of our dual-sided eyebrow pencil. How convenient- we use it on our next step.
-
Define your eyebrows using the long edge of the triangle tip eyebrow pencil, filling in sparse areas. Eyebrow Tip: Apply more pressure with your eyebrow pencil at the arch. Your eyebrow arch should be the darkest area on your eyebrow. You want to draw the most attention here. Trust me, followed by the highlighter we are putting under it later- you are getting an instant facelift for free (almost) #archgoals.
-
Use your eyebrow spoolie brush to blend in the eyebrow pencil, spreading an even, blended application and adhering the makeup to the skin. The eyebrow pencil is waterproof, so make sure it is pressed on your skin and not just resting on your eyebrows to maximize its extreme power!
How to Apply Eyeshadow - Step by Step Eyeshadow Placement
All Eyeshadow Used is From our "I Pink I Love You" Waterproof Eyeshadow Palette


-
We start our eyeshadow look off by applying "Limitless" (the eyeshadow primer included in our Waterproof Eyeshadow Palette) on the entire eyelid up to your brow bone. Use a flat makeup brush (a concealer brush is perfect). You will get an even application, smoothen the skin, and boost the color intensity of the eyeshadow applied on top.
-
In the crease, apply "Tenderly Light" from our Waterproof Eyeshadow Palette. Apply the eyeshadow by using a small round brush. Start at the crease, working your way out and blending the edges to avoid harsh lines.
-
Use "Tenderly Light" again, and apply it directly on the crease. Do not cover the entire blended area a second time. This step is specifically for adding deeper color concentration on the crease.
-
Apply "Tenderly Light" with a small round brush along the entire lower lash line. Make sure it is blended out well, roughly 1/3 cm.
-
Using "Limitless," we start our cut crease and use the eyeshadow primer to "erase the eyeshadow" on our eyelid. Apply the primer across the inner 2/3 of your eyelid. Make sure to stop in the middle of your crease, where your eyelid folds. The line should be smooth or "cut" and not have any wobbly lines.
-
Use a flat brush for maximum color concentration, pigment, and a more precise eyeshadow application to apply "Pinwheel Galaxy" on top of Step 5(our primed lid), around the tear duct, and the inner 1/4 of the lower lash line.
How to do the Perfect Winged Eyeliner

-
Using our winged eyeliner stamp, apply the eyeliner stamp at the outer corner of the eye, facing the wing up toward the end of your eyebrows.
-
Use the precision tip side on our eyeliner stamp and draw across the entire upper lash line, connecting your wing stamp.
Final Steps of Eyeshadow Look
-
Apply "Lavender Fields" using a small, rounded flat brush to add depth to the outer lower lash line. Color concentration should be the deepest at the lash line and not blended out as far as our "Tenderly Light" from Step 4.
-
Draw a line on your crease using a small eyeliner makeup brush with "Limitless." The line should start from the inner 1/3 of your crease, connecting to the end of your winged eyeliner across the natural fold. If you want your eyes to appear larger- draw your crease above your natural crease.
-
Using a flat brush or an angled flat brush, apply eyeshadow color "Marigold" to our cut crease line from Step 2.
-
Lightly Dust "Marigold" onto the bottom of the inner lash line with a small round brush.
-
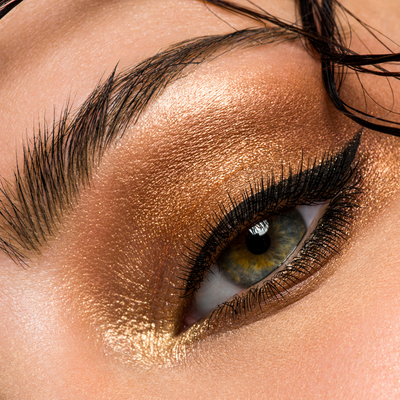
Using a flat eyeshadow brush, apply our Self Adhesive Glitter Eyeshadow "Steam Punk" between the cut crease line and the winged eyeliner without overlapping.
Get Creative with your Winged Eyeliner

- Under the wing, on each eye, use the precision tip side of the eyeliner stamp and draw three small dots starting from the outside of the wing, working your way closer to your eye. Make sure the dots are the same size and evenly spaced out.
How to Apply Mascara
-
We start with a mascara primer to boost up the volume on our lashes and prepare them for the mascara. Use the spoolie brush to apply your mascara. Starting at the base of your lashes and get as close to your lid as possible. Wiggle the spoolie into the lashes as you are applying to coat each lash. Repeat this on the upper and lower lash line.
-
Repeat Step 1 with Black Mascara and make sure to cover the mascara primer. We focus primarily on building the bottom lashes because the top lashes will have false lashes applied to them.
Highlighter Placement
-
Apply a highlighter on the arch of your brow bone to make it pop with a flat round brush.
-
With a fluffy, medium-sized round makeup brush, apply highlighter on the top of your cheekbones and a thin line down the arch of your nose (avoid the tip of your nose if you do not want it accentuated or to appear larger)

-
We use our Faux Mink Lashes in "Jordan" that arrive to you pre-cut, perfectly sized, and ready to wear.
-
Apply a thin strip of our waterproof eyelash glue to the strip lash, allowing the lash glue to tack up to make it easier to apply your false lashes.
-
Rest the false lash against your lashes that we've already applied mascara on. Quick False Lash Trick: Applying mascara before your lashes will make it easier to apply false lashes. The mascara gives the strip lash a "shelf" to rest on, avoiding any sliding and eyelash glue in your eye. Start by lining up the false lash with the outer corner of your lash line for proper placement, then rest the lash on your skin directly against the lash line. Common Mistake - DO NOT APPLY YOUR LASHES TO YOUR LASHES. Apply your lashes on your skin against your lashes.
-
Allow the glue to bond, and squeeze your natural lashes and the strip lash together for proper adhesion, and to make sure your false lashes stay on throughout the day/night.

-
Start at the top middle bow of your lips and draw a "v" with our lip pencil in "Sojourner." Our lip pencils are great because they combine a lip liner and lipstick in one. A precision tip for the preciseness of the pencil with the creaminess of lipstick to ensure even coverage.
-
Follow the "v" down toward the corners of your lips. If you want your lips to appear larger, or if they are uneven, draw them accordingly, making sure not to overdo it and making it obvious.
-
Make a "V" on the outer corners of your lips and one line at the bottom of your lower lip.
-
Connect the bottom line with the outer corner "v's." If you have a hard time getting your lip liner even, this is how you get perfectly shaped lips and an even lip liner application.
-
Fill in the rest of your lips by coloring them with the lip pencil and rubbing them together for even coverage.

If you have any questions, please feel free to reach out or comment below. I would love to help and cannot wait to see your creations!
LET US KNOW IF YOU TRIED OUT THIS LOOK AND BE SURE TO TAG US ON OUR INSTAGRAM @FIRSTCLASSBEAUTYCO #FCBEAUTYCO
Remember to Check out the Rest of our Beauty Blog for More Makeup Looks and Tutorials!
XOXO


Leave a comment